How to Optimize Windows 10 for PC Gaming – Updated for 2020
Regardless of the fact that modern gaming consoles have recently become so powerful, the personal computer is still considered to be the king of gaming.
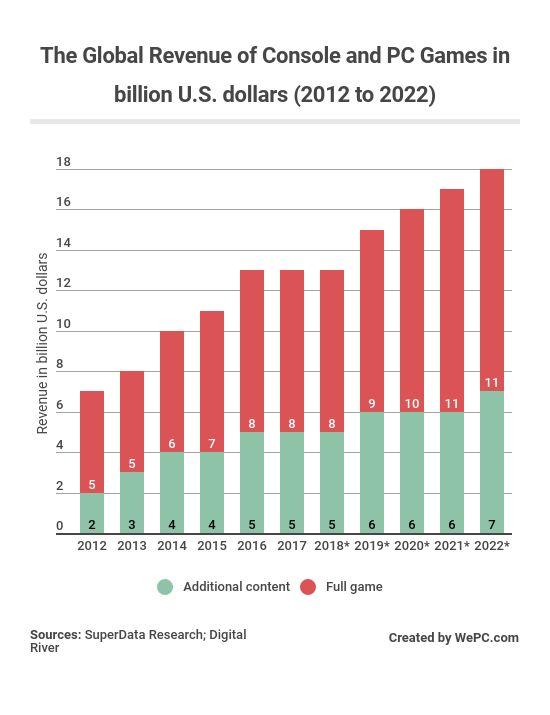
As a matter of fact, in 2017, the total global revenue of PC and console games was over $12 billion, with additional game content taking up to 37%.
This is because of the raw power PC offers the game experience and the numerous possibilities for upgrades which will allow you to upgrade your hardware from time to time to access even more power.
Furthermore, in 2017, American consumers spent over $36 billion dollars on video games, hardware for games, and gaming accessories.

However, as you may already know, the operating system plays the most important role — and Windows 10 is currently the most advanced and latest operating system created by Microsoft.
Nevertheless, most video gamers may decline to agree with this due to the performance of the Windows 10 operating system not matching up to the requirements of most games.
Irrespective of this though, you can still have your Windows 10 optimized through certain tweaks and frequent updates to make sure that it matches up with the required standards for your games.
Now, let’s have a look at some of the tips and steps you can take to boost your gaming experience to a whole new level.
Step 1: Privacy and Windows Updates
Let’s begin this optimization guide for Windows 10 by looking at how you can increase your gaming experience by manipulating some of the Update Settings. The first thing to do is to turn off updates for peer-to-peer.
If you are an advocate for strict privacy, sharing would certainly not be caring to you.
Hence, if you love your privacy and are not a fan sharing things through your PC, you may want to restrict Windows 10 from uploading updates from your PC to someone else’s computer without your knowledge.
Windows has this setting turned on by default, and it may be a little hard to locate, so follow me closely and carry out the exact same steps:
- Open up your settings application or use the shortcut (win + i)
- Click Update and Security
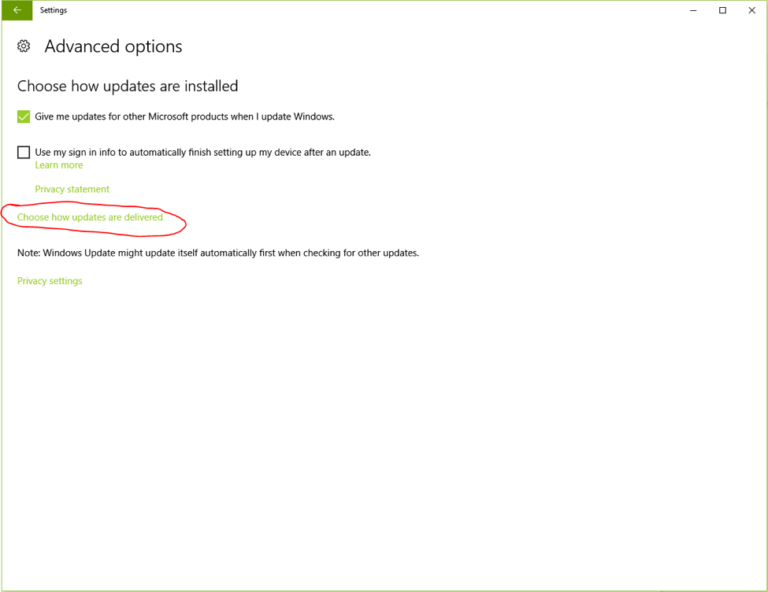
- Click Advanced options
- Select how your updates are delivered
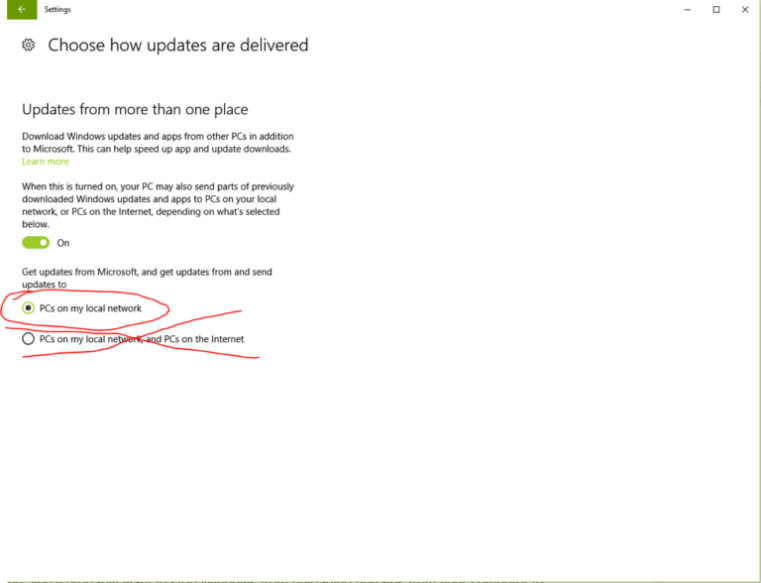
- Choose PC on the local network
- Or if you’re still not convinced it’s stopped, simple choose turn off update sharing
Follow these illustrated steps:
Step #a

Step #b
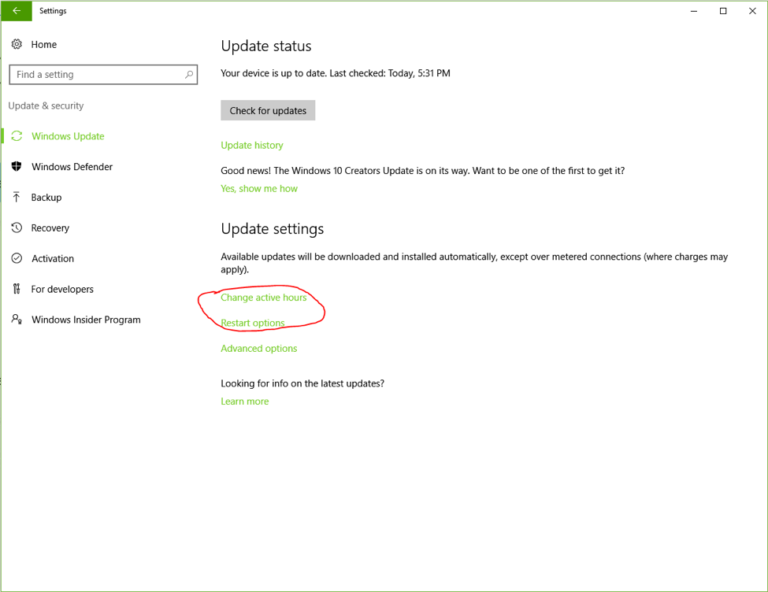
Step #c
Updates are definitely not what you would want to share over the web to PCs you do not know. However, when you share updates only in your home network, with other Windows 10 PCs in your home, it would be more beneficial in improving your gaming experience.
Step #2: Pick Active Hours
To fully understand this aspect of the Windows 10 optimization for gaming, imagine that you are in some primitive Jungle running from away from natives of the jungle who want to harm you.
And you need to get to 4.104673N by 51.520070E to escape — your laptop is what you would use to get there, then based on Murphy’s Law that states “what will go wrong will go wrong” your Windows 10 begins to operate in a forced update and then reboots.
The end result is that the native jungle cannibals would probably eat your flesh.
Now, in reality, you won’t be faced with such a situation, however, forced updates can be as annoying as such an experience. So, it’s best practice to pick your active hours as well as reboot options when optimizing your Windows 10 PC.
Active hours inform windows that it isn’t okay by you for it to automatically reboot your system without giving you prior notice beforehand.
Restart or reboot options will allow you to pick when to reboot your system when there are new updates pending. You can locate both of these options by carefully following the below instructions:
- Open up your settings app simply using the combination (win + i)
- Select update and security
Step 3: Windows and Application Updates
If you’re following this guide step by step, you should be in the update and security area of Windows 10, so if you have not had the latest Windows 10 updates installed, you should install them.
It’d be very irritating to have your PC blue-screen when you are finally about to cross that difficulty level. Hence, if you want to avoid that, check for updates and have them installed.
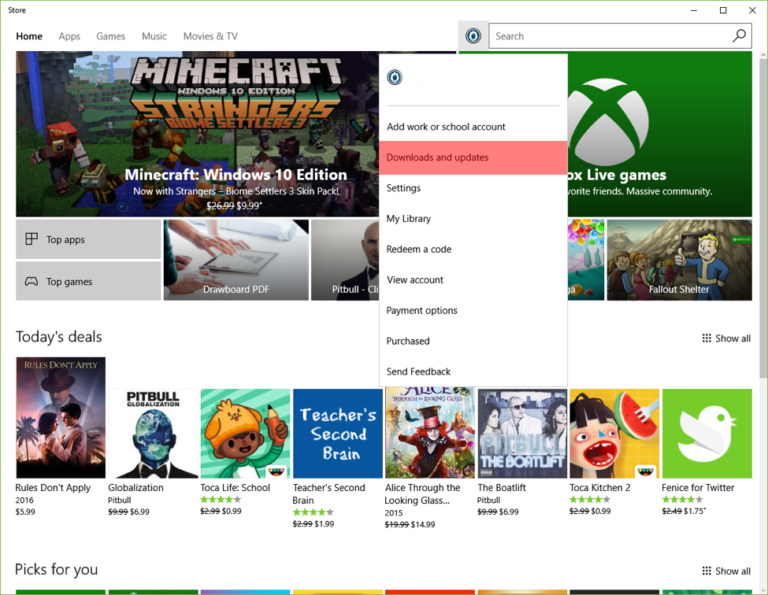
Now, the next step is optimizing your Windows 10 OS for gaming. By now you should already have your Windows 10 all updated, however, that isn’t enough, its best practice to update the brand new app store applications on Windows 10. To do that carry out the following instructions:
- Click to open the store application
- Select your profile image right beside the search box
- Select “downloads and updates”
This will navigate you to the page for downloads and updates, where you can search for and install the latest updates to your apps store applications.
Step 3: Turn Off Wi-Fi Sense
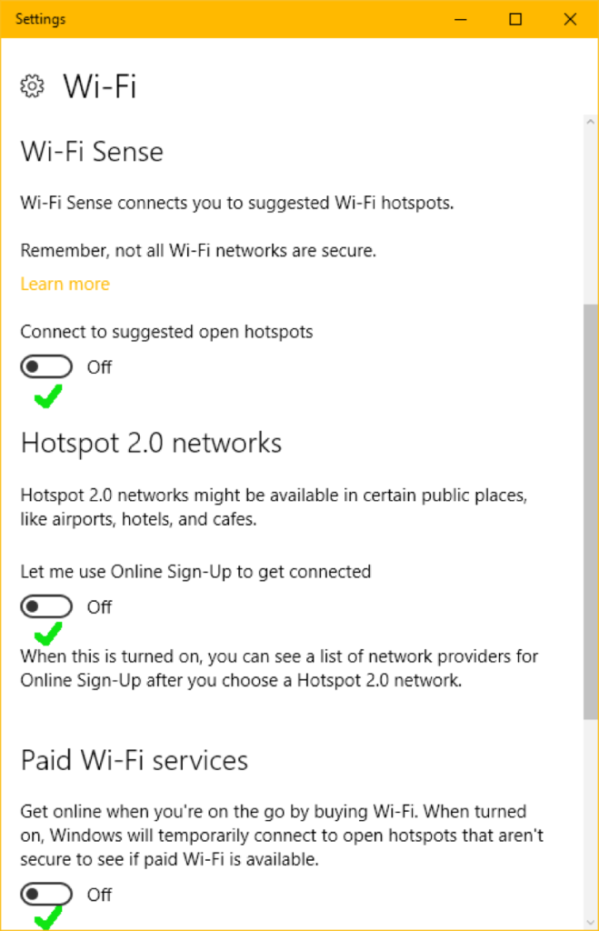
Wi-Fi Sense is turned on by default and will try to automatically connect you to recognized or safe networks if it’s turned on. From coffee shops Wi-Fi, to your neighbors, hotels or even airports, basically any Wi-Fi it deems safe to connect too.
This is a very inconvenient feature placed into Windows 10 which only ends up creating headaches, security concerns, and the frequent fear that you may be connected to a metered Wi-Fi and not be aware.
Well, luckily Wi-Fi Sense is very easy to disable and below we’ll see how to do just that.
- Use win + i to open up settings
- Select Networks and Internet
- Click Wi-Fi
- Turn off all options below Wi-Fi Sense
That’s all for this aspect of Windows 10 optimization for gaming. Keep in mind that this option is only relevant if you’re making use of a wireless connection.
Step 4: Drivers
You cannot completely go through the process of Windows 10 gaming optimization without having your drivers updated. Drivers are aspects of software that permit your operating system to effectively communicate with your PCs hardware.
From your keyboard to the mouse, to even the simplest functionality of your computer’s motherboard, drivers are a major part of your computer.
Most of your drivers are what enable the efficiency of motherboard functions like audio networking, USB support and lots more. There are even drivers that communicate with graphics cards.
These drivers will help you to utilize the full potential of your graphics card. Without it, your computer system will most definitely show you reduced frame-rates. Furthermore, in certain instances, your games will out-rightly decline to open.
Getting the relevant drivers is a huge aspect of optimizing Windows 10 for your games.
Due to the fact, that your drivers are created to fit the needs of both your OS and your particular model for a specific piece of hardware. It won’t be possible to give you links to all the necessary drivers your computer requires.
However, for convenience sake, let’s see a list of suggested drivers that will help you get started in optimizing windows 10.
To locate these drivers, you simply need to search Google by typing in the specific model of your hardware in the search bar, along with “drivers” or “support” as keywords.
For example: “ASVA PVX 1070 Drivers”. For graphics cards, it’s important to know that the card manufacturer is where you’d want to get the drivers from rather than a random retail website.
Below are the various types of drivers:
- Motherboard audio drivers
- Motherboard USB drivers
- Graphics card drivers
- Motherboard chipset drivers
- Motherboard LAN/Networking drivers
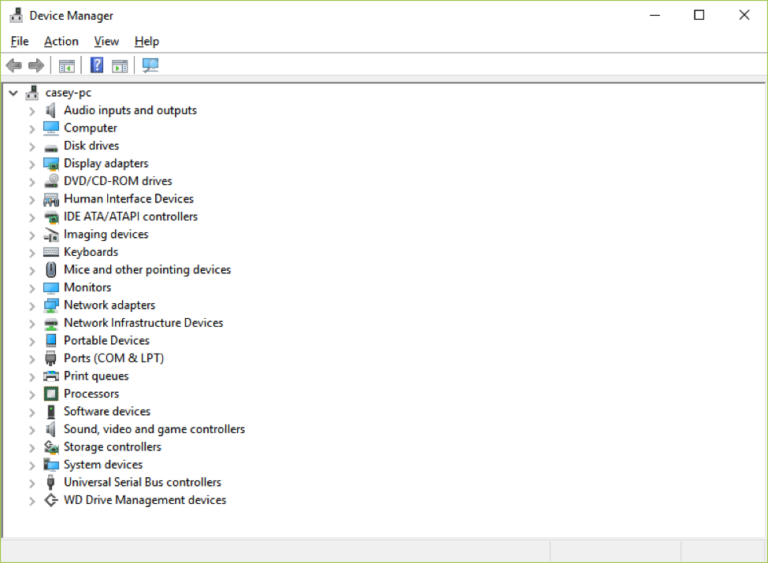
If you want to know what drivers are absent from your PC or laptop, navigate to device manager:
-
Click Control Panel
-
Select Device Manager
Devices that do not have drivers will be shown in the “Other Devices” area with a question mark right beside their names.
In a perfect situation, you shouldn’t have any devices with question marks beside their name. Also, if there are question marks and you install those specific drives, you shouldn’t see any question marks after that.
This list above of the type of drivers you should install is enough in most cases but in some cases, you may need more. However, these should handle your optimization of Windows 10 for gaming.
Control Panel Items
Mouse
If you will be using a mouse with your computer, then there are certain things you need to do, in order to be able to fully optimize your PC for mouse use. First, you need to disable the “help” that the windows offered you. Follow the following steps:
1. Go to the control panel and click on “Mouse” (this will bring up the mouse settings)
2. Select the “Pointer Options” tab and ensure that “Enhance pointer precision” is turned off. Also, ensure that the speed of the pointer is set on the 6th notch from either the left or right.
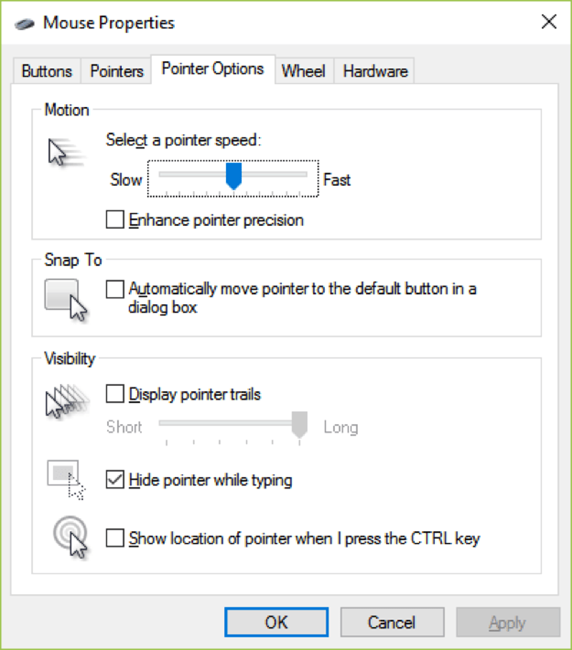
After this is done, the mouse acceleration will be disabled and the windows will be prevented from modifying the mouse input.
Power Options
It is important to change the default power options when optimizing your Windows 10; this will eliminate any power server feature challenge and will also enable your game to perform optimally.
In order to change the default power options settings, take the following steps:
-
Go to the start menu and type in “Power Options” and hit enter
-
Choose the plan you desire
-
Select “Change Plan Settings”
-
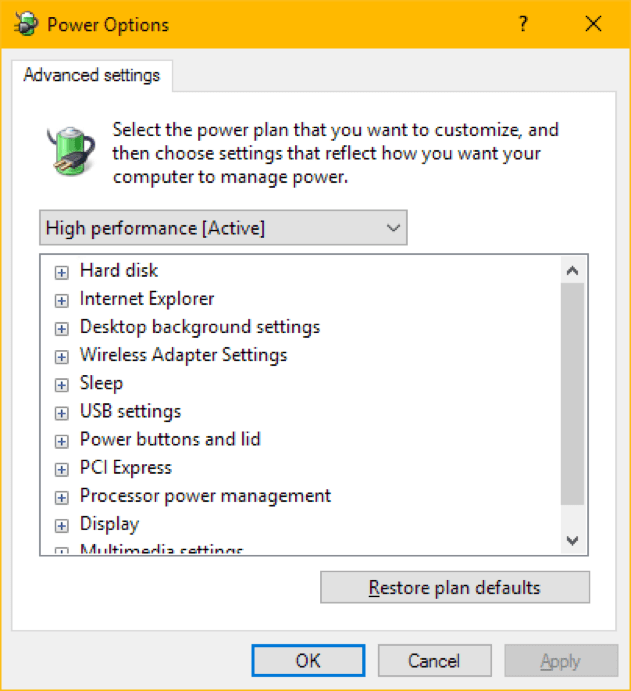
Select “Change advanced power setting”
It is important to note that if you are optimizing Windows 10 for gaming laptops that is tethered to a constant form of energy, you will need to enable High-Performance mode, this will give your devices complete access to its GPU and CPM.
In order to make these changes (which may consume more battery life and electricity), follow the following steps:
1. Disable “Turn off hard disk” this should be done by setting the minute to zero (0)
Note: if you are on Wi-Fi, change the wireless adapter settings to maximum performance. But if you feel it is not necessary, disable Sleep.
2. Disable USB selective suspend, this will ensure that all your USB devices are functioning at all time.
3. Disable Link State Power Management for PCI
4. Change the inactive window on Sleep Mode for your display
Set Default Programs
You will also need to set some default applications when optimizing your Windows 10 for gaming. This will enable you to open files. To be able to do this, follow the steps below:
1. Go to the start menu, type in “Default Programs” and press enter
2. Then proceed to change your defaults to any application you prefer (Windows will allow you to have a default application to use to launch any action for example music, browsing and watching videos)

This process is very short and straightforward.
Change default media directories
If you have an SSD installed or you are using many hard drives while playing games on your Windows 10 you will admit that the gaming performance needs to be improved, especially because you will need to move some file types into a separate drive.
Many files on the PC can eat up space and to avoid filling up your SSD or fragmenting your operating system, you will need to move these bulky files into a separate hard drive or computer. To do this effectively, follow these steps:
1. Open Explorer (use the shortcut win + e)
2. Go to “This PC” and right click the folders you want to move, select the properties.
3. Under the location tab, you can put the new directory; you can do this by moving to the drive or folder where you wish to transfer the files into. Once you get this, paste the files into the drive or folder

The changes made will reflect in the start menu and the side of Explorer.
Important Applications
Ninite
This is an application that is designed to make installing and retrieving common programs easy. This could include backend software for Windows, web browsers, antivirus eyes. This application is a must-have if you are optimizing your Windows 10.
In order to be able to use the Ninite app on your PC do this:
Select all the applications that you want to Install and click “Get You Ninite” when you do this, a guide will be downloaded, this file can be run to download and install all the applications you selected.
Instead of having to download, run and delete the installer, Ninite will help you to connect the Internet and download all the programs you need and it will ask to deselect any third party installer or options for toolbars which may accompany the selected applications.
As awesome as Ninite is, it has one shortfall, which is that your PC must be connected to the Internet; this is because it does not include the installers in its download. This notwithstanding, Ninite is a great application that you must have when optimizing your Windows 10.
Removing Bloatware
Bloatware is pre-installed software on the computer that can be a bit annoying to users. Windows 10 is preloaded with many unnecessary applications which will get in the way of users.
Removing this Bloatware will improve your gaming performance on Windows 10.
Some of this Bloatware is software like candy crush, news app, my phone app, Xbox app and so on. These apps are rarely used by users and they waste RAM, space and even the processing power of the PC. Removing this software will do you a lot of good.
The PC Decrapifier
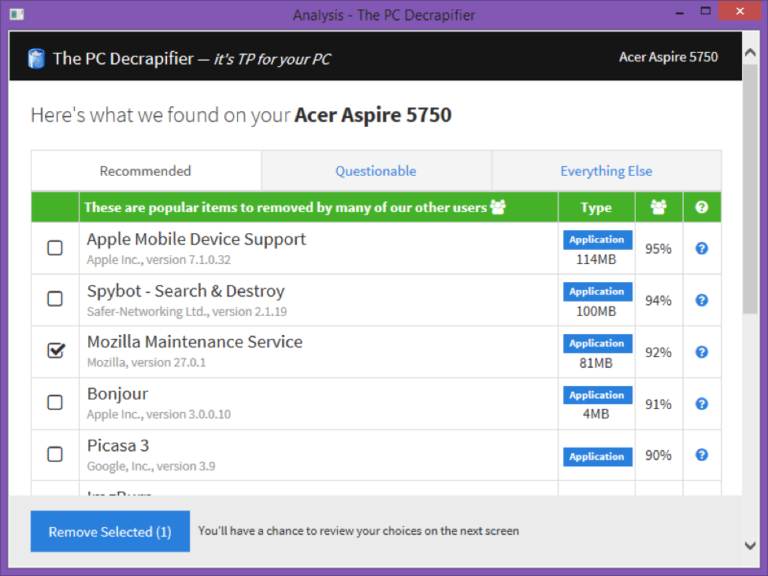
The PC Decrapifier is an application that is designed to identify and get rid of bloatware from your PC. It does an excellent job detecting and removing unnecessary applications that come with Windows 10 which are not relevant to the users.
Such applications include Get Office 365 and Get Skype. PC Decrapifier is excellent at discovering and removing toolbars and software that are embedded in applications that you download.
Removing all these unnecessary applications will free up the memory of your PC and will also enhance your gaming performance.
Helpful Software You Should Have Installed Already
There are certain software’s that you must have which will make you Windows optimization very easy. These software’s can extend the base functionality of your Windows operating system.
The good news is that these software’s are available online for easy download and most of them are free. These software’s will add a finishing touch to the operating system of your Windows for gaming and will open the door of new possibilities while gaming.
CCleaner

This software will help to clean out your storage space. It will free up space on your storage device and will also delete private data like browsing history, clipboard and Internet cache.
If in the process of your Windows 10 optimization, you feel it is necessary to free up some space, then you should run CCleaner.
It will help you to find and delete useless files that are taking up space. It is a known fact that hard drives function better when they have some free space.
You may be wondering why you will need to delete your internet cache of browsing history. Well, these private data can be used to monitor and track your online activity. When you erase these private data using CCleaner, you can have your privacy in while optimizing your Windows 10 for gaming.
Discord

This is a voice over application that is designed for community communication and collaborative gaming. It is very important for Windows 10 optimization.
This application is free to use and you can choose to use it directly through your browser or you could download the desktop or mobile discord application. Each server on the Discord application support role-based delegation of permissions to participate in channels and modify them.
This feature aids to make it easier for server administrators to have a pleasant community atmosphere. The text chat and voice chat channels are separate and you can be present in both channels at the same time.
You, however, cannot be active on both channels at the same time. You can switch rooms by clicking on a new channel; this will enable a single discord server to support multiple conversations at a time.
CPUID Suite
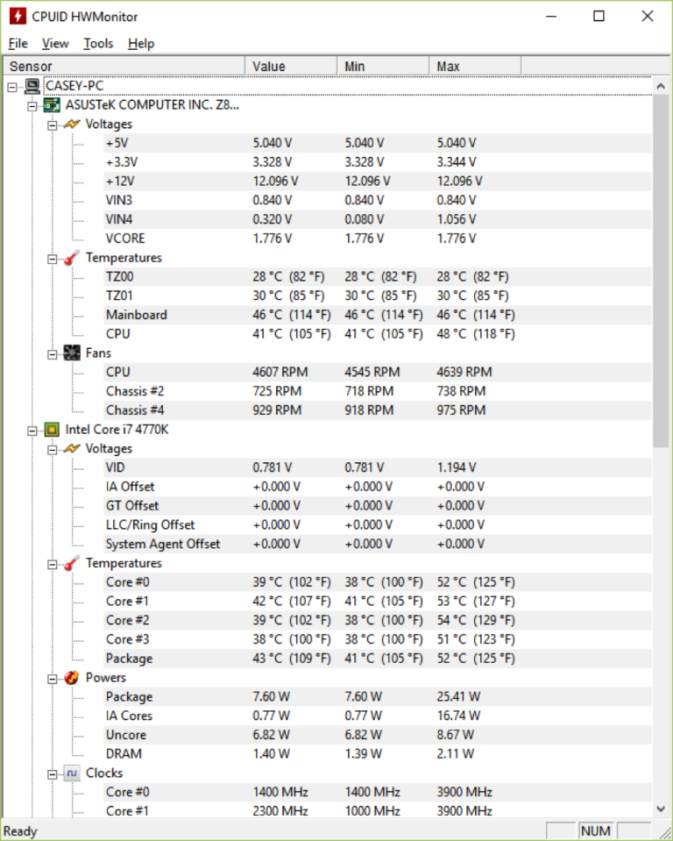
The CPUID suite provides much software that is very essential for gathering information about your PC, especially for Windows 10 optimization. HWMonitor and CPU-Z ate the two most common and highly recommended options for optimizing your Windows 10 for gaming.
After you install CPU-Z, it will let you know everything you wish to know about your CPU. In like manner, after a few minutes of installing HWMonitor, it will give you visibility and enable you to see the various sensors of your computer like the fan speed and temperature.
These tools can come in very handy when you want to troubleshoot problems in your computer by yourself.
Even if you are troubleshooting by yourself, this software will enable you to accurately describe your system and also use specific terms when talking about the problem to technicians, this will enable them to understand what you are saying faster.
Backup Software

That importance of having backup software cannot be overemphasized. If your system decides to pack up without any hope of getting restored, what will ease your tension and eliminate the fear of your files being lost forever that you have a backup somewhere?
When optimizing your Windows 10, it is important to backup all your important files.
There are two types of backups that you will need and this should be done during the optimization process. First is the file system backup, where you simply gather all your files and keep an extra copy of all of them.
The second type is the system image backups; this will allow you to restore your computer totally to a point in time.
If you wish to do any of these types of backups, you can use the following software Acronis (Premium version), Backup 2(premium version) Veeam (free for home), and CrashPlan (premium).
You can install any of this software during the optimization process, it will come in handy later in the future.
Conclusion
For all gamers, having a PC that doesn’t function optimally with your favorite games can be very annoying. This is why knowing how to optimize your OS for the best gaming experience is essential.
The worst thing that could happen when you’re trying to win a level is for your laptop or PC to automatically start rebooting or freeze up with the notorious blue-screen. It could set you back in your gaming journey especially if you don’t auto-save.
However, following the steps listed above is enough to handle any problem that could arise due to poor compatibility of your Windows 10 OS with your favorite games.